Setup Guide
Simple Setup
This guide provides step-by-step instructions for setting up AddressComplete. It also provides tips for best results and advanced options.
Prerequisite: You’ll need to know how to access to the source code for your website and have permission to change it.
From the AddressComplete website, select Start Your Free Trial.
If you already have an account you can sign in here and select the Create New Installation button to start a fresh installation.
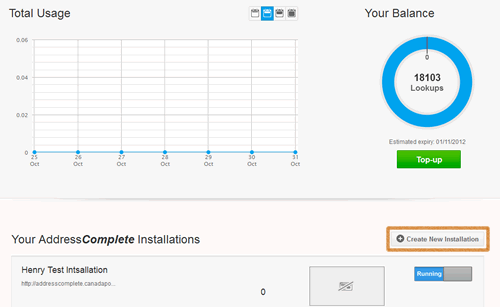
Enter the URL of the web page on which you want to set up AddressComplete.
Tip: If your page uses SSL, make sure you select https from the drop-down menu.

Copy the code snippet provided into the source code of your web page.
Important: Paste the code into the head of your page.
Note: If you would like AddressComplete to be available in a separate text box to your address fields, you will need to add an extra field to your form, and set the placeholder text for that field.
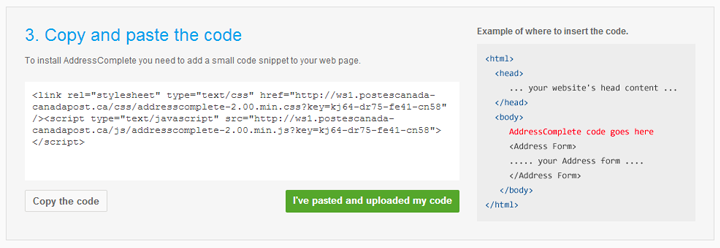
Once you’ve saved the changes to your website, select I’ve pasted and uploaded my code.
AddressComplete will check your web page and make sure you’ve copied the code properly. A verification code will appear on the screen. Make note of it as you may be asked for this later.
Note: If your page is behind a login page we won’t be able to verify your code, but you can still proceed.

From a web browser, open your web page. (If it’s already open, you may need to refresh the page).
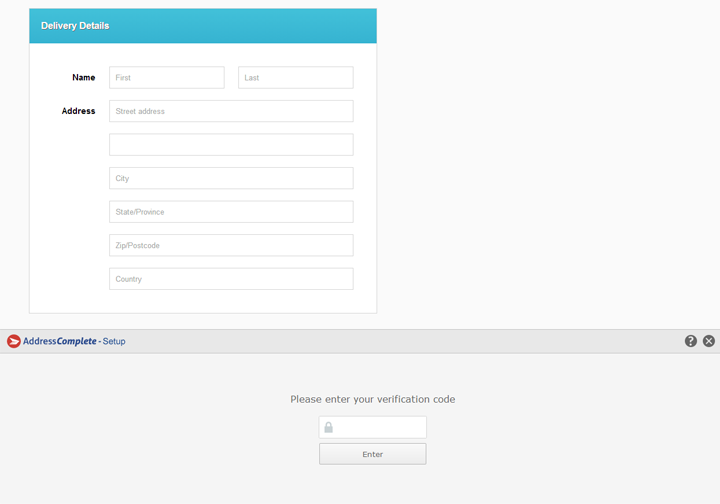
Start entering an address. You should see AddressComplete predicting addresses as you type. If you do, then your installation was successful. You’re done!
Note: If you would like AddressComplete to be available in a separate text box to your address fields, map your extra field to the ‘Search Input’ field.
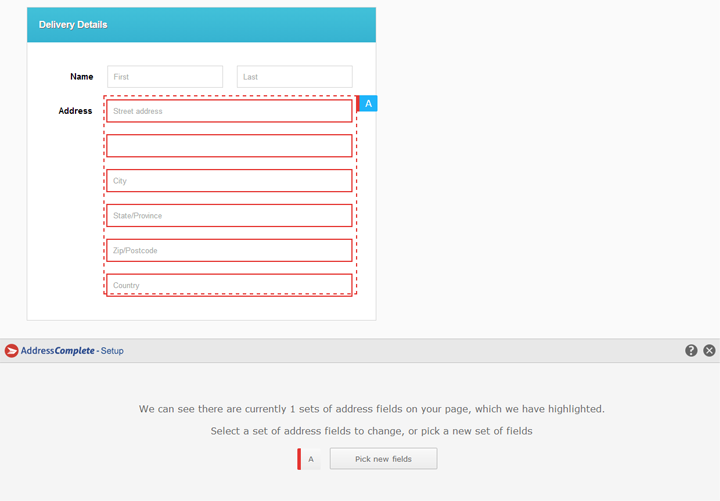
Advanced: To set a field to populate with results, but not trigger a search, uncheck the ‘Search’ option in the extra settings menu. This is useful if you want AddressComplete to appear in a separate search field.
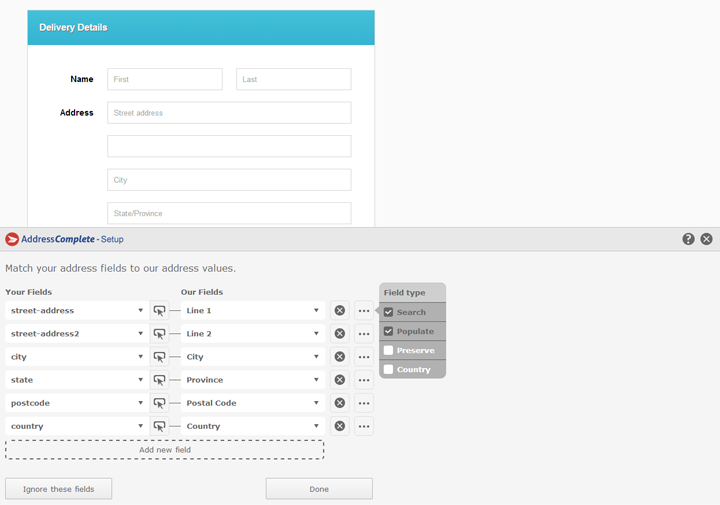
To add the Multi-unit and/or the Business/Residential flags, click on ‘Add new field’. Select your field you want and enter manually the mapping.
Note: in order to add new mappings successfully, you will need to add the curly braces around the field name.
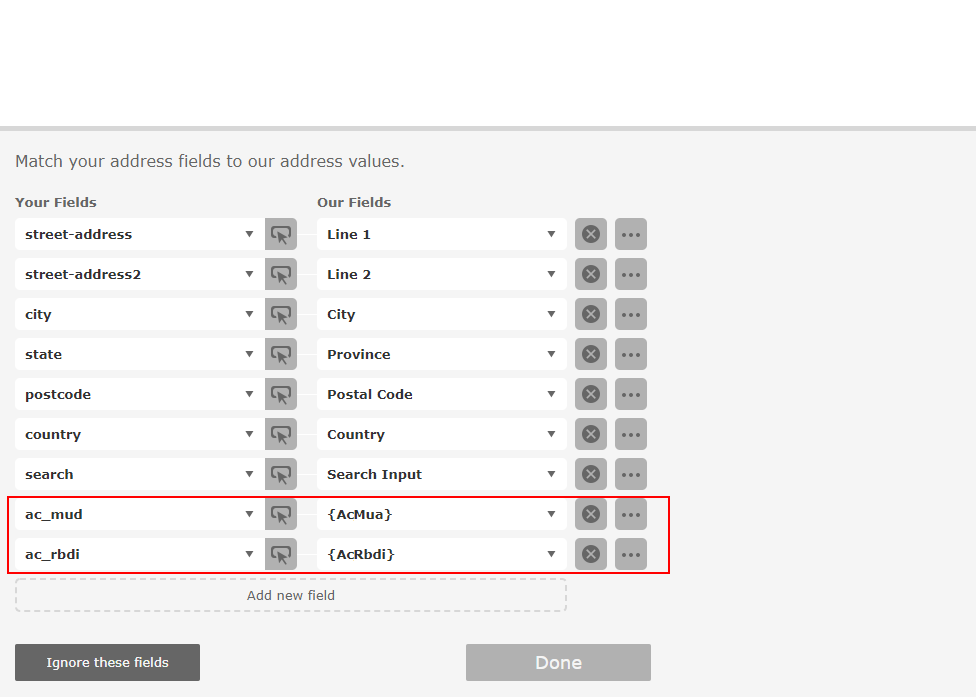
Once you have finished mapping AddressComplete fields with the fields on your form, select Done and refresh your page to complete the installation.
If the installation is still not working, go to your dashboard and select your installation.
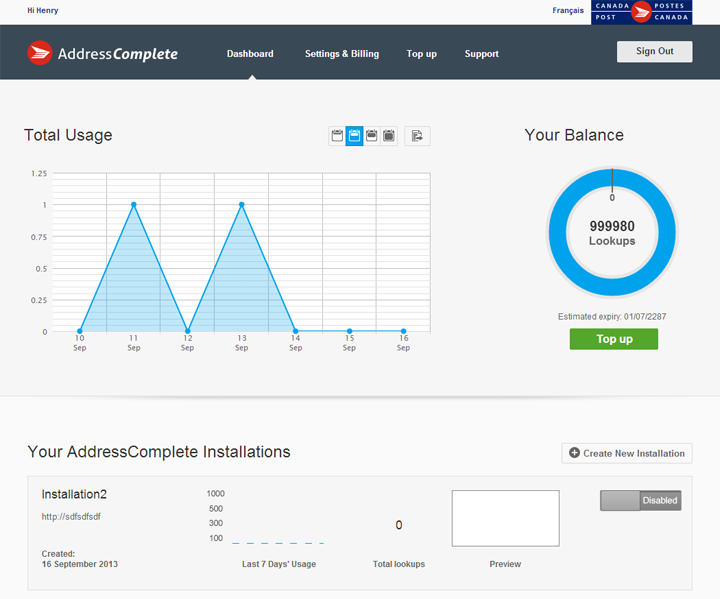
You’ll be able to access the settings page for your installation:
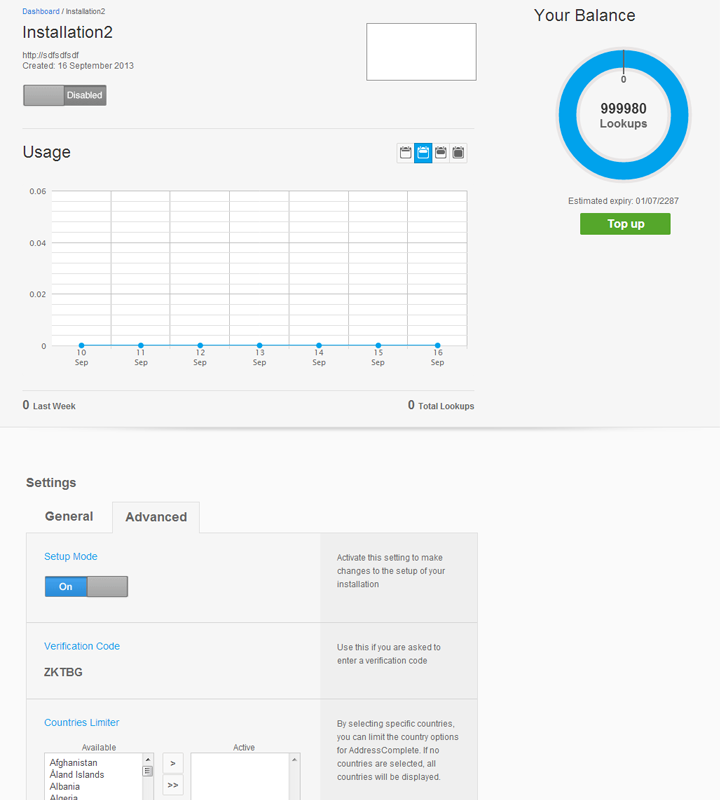
Select the Advanced tab and turn on Setup Mode. Again, take a note of the verification code.
We recommend that you configure the following settings:
- Name
Give the installation a name that will help you and anyone else who may use your account easily identify where it is being used. - Daily limit
Each installation can be limited to only allow a certain number of lookups in a day, up to a maximum spend limit. If you have an idea of how much this installation will be used in a day, you can use this setting to ensure it doesn’t get overused. - Valid URLs
To stop anyone else from being able to use your installation on another website, you should restrict it to your own website by entering any URL used to access your website in the appropriate box. These can be as specific as required, e.g. www.mysite.com, www.mysite.ca/mysection/mypage.htm. - IP limiter
The look-up limit can be further restricted by limiting the number of lookups available from any given IP address each day. You can also enter exceptions to this rule that will not be restricted, for example your office IP address can be excluded from the IP limiter.
Note that while a lot of visitors to your site may have a unique IP address, some users may use an IP address previously assigned to another visitor. This can be the case for users of certain ISPs, but more often for business users where internet traffic is channelled through a single connection.
Top tips for a successful integration
- Install AddressComplete as a new field rather than integrating it into your existing form fields; it’s easier for users to understand and use.
- Put the country drop-down list of your address form at the bottom of your address fields, rather than at the top. This way AddressComplete can populate the country automatically and will ensure users do not have to select the country twice.
- Ensure you have sized your address fields appropriately for the information that will be entered into them.
- Consider regional differences in address layout and naming conventions if you deal with international customers.
- If you provide billing and shipping addresses separately make sure you integrate AddressComplete into both.
Setup and API Key Creation
To create an API key:
Sign in to the AddressComplete website.
From the Dashboard, select Create New Installation.
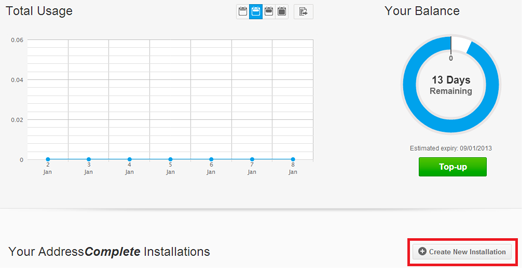
Select Skip setup and create an advanced API key.

Enter a name for your API key. This is the name that will appear when you view your integrations/keys in your dashboard

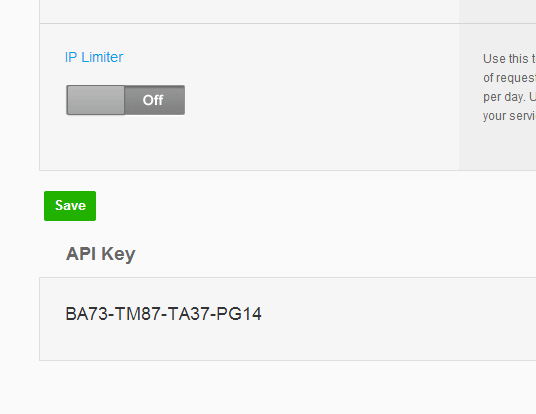
You will be brought to a detail screen for the newly created key. Scroll down to the API key section to retrieve your key. If desired, you can also change any other settings on the key, such as valid URLs and IPs, the IP limiter and the daily limit.
Navigate to the main AddressComplete website and select Support.

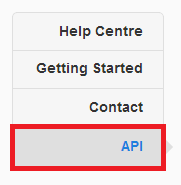
From the left menu, select API to access the documentation you need to create a request to the AddressComplete web service.
Advanced Options
For more advanced setup options, use the API-based setup, rather than the setup wizard. This can be useful when implementing specific AddressComplete behavior on the selection of an address.
Based on the form layout shown below:
<div class="input-line">
    <label for="street-address">Address</label>
    <input id="street-address" type="text" placeholder="Street address" autofocus />
</div>
<div class="input-line">
    <label for="street-address2"></label>
    <input id="street-address2" type="text" placeholder="" />
</div>
<div class="input-line">
    <label for="city"></label>
    <input id="city" type="text" placeholder="City" />
</div>
<div class="input-line">
    <label for="state"></label>
    <input id="state" type="text" placeholder="State/Province" />
</div>
<div class="input-line">
    <label for="postcode"></label>
    <input id="postcode" type="text" placeholder="Zip/Postcode" />
</div>
<div class="input-line">
    <label for="country"></label>
    <input id="country" type="text" placeholder="Country" />
</div>

<div class="input-line">
    <label for="multi-unit"></label>
    <input id="multi-unit" type="text" placeholder="Multi-Unit-Indicator" />
</div>
<div class="input-line">
    <label for="residential-business"></label>
    <input id="residential-business" type="text" placeholder="Residential/Business" />
</div>
A typical API setup might look like below.
Note: If you want to use the extra flags we offer, you can map these as shown below. Make sure you include the curly braces when setting the field value.
<script type="text/javascript">
    var fields = [
        { element: "search", field: "", mode: pca.fieldMode.SEARCH },

        { element: "street-address", field: "Line1", mode: pca.fieldMode.POPULATE },
        { element: "street-address2", field: "Line2", mode: pca.fieldMode.POPULATE },
        { element: "city", field: "City", mode: pca.fieldMode.POPULATE },
        { element: "state", field: "ProvinceName", mode: pca.fieldMode.POPULATE },
        { element: "postcode", field: "PostalCode" },
        { element: "country", field: "CountryName", mode: pca.fieldMode.COUNTRY }

        { element: "multi-unit", field: "{AcMua}", mode: pca.fieldMode.POPULATE },
        { element: "residential-business", field: "{AcRbdi}", mode: pca.fieldMode.POPULATE }
    ],
    options = {
        key: "AA11-AA11-AA11-AA11"
    },
    control = new pca.Address(fields, options);
</script>
The parts of this setup are as follows:
- fields
This array is where the fields that AddressComplete uses are defined: element is the id of the element you want to use, field is the AddressComplete field to associate with that element, and mode allows you to select the mode the field will operate in. - options
This is where the options for the AddressComplete control are defined - control
This is where the AddressComplete instance is initiated using pca.Address(fields, options)
Options
- key (required)
The key used to authenticate the request. This can be copied from the code sample of an AddressComplete installation. - name
A reference for the control used as an id to provide ARIA support. - populate
Defaults to true. Used to enable or disable population of all fields. - onlyInputs
Defaults to false. Only input fields will be populated. - autoSearch
Defaults to false. Search will be triggered on field focus. - prompt
Defaults to false. Shows a message to prompt the user for more detail. - promptDelay
Defaults to 0. The time in milliseconds before the control will prompt the user for more detail. - setCursor
Defaults to false. Updates the input field with the current search text. - minSearch
Defaults to 1. Search will be triggered on field focus. - maxItems
Defaults to 0. The maximum number of items to show (0 = disabled). - manualEntry
Defaults to false. If no results are found, the message can be clicked to disable the control. - disableTime
Defaults to 60000. The time in milliseconds to disable the control for manual entry. - suppressAutocomplete
Defaults to true. Suppress the default browser field autocomplete on search fields. - setCountryByIP
Defaults to false. Automatically set the country based upon the user IP address. - culture
Force set the culture for labels, e.g. “en-us”, “fr-ca”. - languagePreference
The preferred language for the selected address, e.g. “eng”, “fra”.
Field Modes
- pca.fieldMode.DEFAULT
This is the default mode and combines the actions of SEARCH and POPULATE. - pca.fieldMode.POPULATE
This mode will populate the element with the AddressComplete field when a user selects an address. Typing in this field will not trigger an AddressComplete search. - pca.fieldMode.COUNTRY
This mode indicates a country selector. This can be used to select the country for AddressComplete to search in. - pca.fieldMode.SEARCH
This sets the field to an AddressComplete search field. Typing in this field will trigger searching via the AddressComplete control. - pca.fieldMode.NONE
This field will be ignored. - pca.fieldMode.PRESERVE
This prevents the field from being overwritten by AddressComplete.
Advanced AddressComplete Options
Triggering events when an address is returned
When an AddressComplete lookup returns an address, you may wish to trigger an event on your page, such as a success message. To do so, insert the following code into the header of your page, and include the event in the relevant section of the code.
<script type="text/javascript">
    addressComplete.listen('load', function(control) {
        control.listen("populate", function (address) {
            //add custom code here
        });
    });
</script>
Accessing the contents of the response from an address retrieve request
The contents of the response from an AddressComplete request can be accessed and then manipulated if you need to use the various elements of the address. Insert the code below into your page and then modify to access the relevant part of the address object (for example, in the example below: “Postcode”).
<script type="text/javascript">
    addressComplete.listen('load', function(control) {
        control.listen("populate", function (address) {
            document.getElementById("line1").value = address.Line1;
        });
    });
</script>
Address Complete altering/stretching your form
Depending on the layout and styling of your page, Address Complete might stretch the elements of your form, especially if they are very short. To avoid this, put the AddressComplete control into a div fixed to the same width as your fields. This can be done by using code like this:
<script type="text/javascript">
    addressComplete.listen('ready', function() {
        addressComplete.setWidth(300);
        addressComplete.setHeight(300);
    });
</script>
Changing drop-down font colour/size
To change the colour and font of the text that appears in the Address Complete search drop-down box, insert this code into the header of the page:
<style type="text/css">
    .pca .pcatext {
        font: 15px Verdana;
        color: #4682b4;
    }
</style>
Enabling/disabling the control dynamically
On some pages you may want to control when the AddressComplete lookup control is loaded, rather than it always being operational. Use the code below to enable/disable the control.
<script type="text/javascript">
    addressComplete.listen('ready', function() {
        addressComplete.enable();
        addressComplete.disable();
    });
</script>
Setting the country dynamically
You may wish to set the country for the AddressComplete control dynamically, either because of selections users have made, or the page they’re on. This will over-ride the default functionality that selects the country based upon the user’s IP address. Use the code below.
<script type="text/javascript">
    addressComplete.listen('ready', function() {
        addressComplete.setCountry("France");
    });
</script>
Locations you don’t want to deliver to
If you have some areas that you can’t deliver to then you may want to indicate this to your customers when they do their address lookup. The code below illustrates how this can be achieved by looking at a province in the response from the address lookup and displaying an appropriate error message when addresses in a specific province are returned. This could be adapted for other address elements such as cities or Postal Codes.
<script type="text/javascript">
    addressComplete.listen('load', function(control) {
        control.listen("populate", function (address) {
            if ( address.ProvinceCode == "ON" ||  address.ProvinceCode == "QC") {
                //EXAMPLE – do not deliver to ON or QC
                alert("Sorry we do not deliver to this address");
            }
        });
    });
</script>
Setting additional control options
You can override additional control options in order to change its style further.
<script type="text/javascript">
    addressComplete.listen('options', function(options) {
        options.bar = options.bar || {};
        options.bar.showCountry = false;
        options.bar.showLogo = true;
        options.bar.logoLink = false;
    });
</script>
Setting the language of the control
You can set the language of the control UI at any time to suit your current page language culture.
<script type="text/javascript">
    addressComplete.listen('ready', function() {
        addressComplete.setCulture("fr-CA");
    });
</script>
Changing the text of messages in the control
You can set the content of the messages displayed to users.
<script type="text/javascript">
    pca.messages.en.DIDYOUMEAN = "Did you mean:";
    pca.messages.en.NORESULTS = "No results found";
    pca.messages.en.KEEPTYPING = "Keep typing your address to display more results";
    pca.messages.en.RETRIEVEERROR = "Record could not be retrieved";
    pca.messages.en.SERVICEERROR = "Service Error:";
    pca.messages.en.COUNTRYSELECT = "Select Country";
    pca.messages.en.NOLOCATION = "Sorry, we could not get your location";
    pca.messages.en.NOCOUNTRY = "Sorry, we could not find this country";
</script>
Advanced API Options
Advanced Options
For more advanced setup options, use the API-based setup, rather than the setup wizard. This can be useful when implementing specific AddressComplete behavior on the selection of an address.
Based on the form layout shown below:
<div class="input-line">
    <label for="street-address">Address</label>
    <input id="street-address" type="text" placeholder="Street address" autofocus />
</div>
<div class="input-line">
    <label for="street-address2"></label>
    <input id="street-address2" type="text" placeholder="" />
</div>
<div class="input-line">
    <label for="city"></label>
    <input id="city" type="text" placeholder="City" />
</div>
<div class="input-line">
    <label for="state"></label>
    <input id="state" type="text" placeholder="State/Province" />
</div>
<div class="input-line">
    <label for="postcode"></label>
    <input id="postcode" type="text" placeholder="Zip/Postcode" />
</div>
<div class="input-line">
    <label for="country"></label>
    <input id="country" type="text" placeholder="Country" />
</div>

<div class="input-line">
    <label for="multi-unit"></label>
    <input id="multi-unit" type="text" placeholder="Multi-Unit-Indicator" />
</div>
<div class="input-line">
    <label for="residential-business"></label>
    <input id="residential-business" type="text" placeholder="Residential/Business" />
</div>
A typical API setup might look like below.
Note: If you want to use the extra flags we offer, you can map these as shown below. Make sure you include the curly braces when setting the field value.
<script type="text/javascript">
    var fields = [
        { element: "search", field: "", mode: pca.fieldMode.SEARCH },

        { element: "street-address", field: "Line1", mode: pca.fieldMode.POPULATE },
        { element: "street-address2", field: "Line2", mode: pca.fieldMode.POPULATE },
        { element: "city", field: "City", mode: pca.fieldMode.POPULATE },
        { element: "state", field: "ProvinceName", mode: pca.fieldMode.POPULATE },
        { element: "postcode", field: "PostalCode" },
        { element: "country", field: "CountryName", mode: pca.fieldMode.COUNTRY },

        { element: "multi-unit", field: "{AcMua}", mode: pca.fieldMode.POPULATE },
        { element: "residential-business", field: "{AcRbdi}", mode: pca.fieldMode.POPULATE }
    ],
    options = {
        key: "AA11-AA11-AA11-AA11"
    },
    control = new pca.Address(fields, options);
</script>
The parts of this setup are as follows:
- fields
This array is where the fields that AddressComplete uses are defined: element is the id of the element you want to use, field is the AddressComplete field to associate with that element, and mode allows you to select the mode the field will operate in. - options
This is where the options for the AddressComplete control are defined - control
This is where the AddressComplete instance is initiated using pca.Address(fields, options)
Options
- key (required)
The key used to authenticate the request. This can be copied from the code sample of an AddressComplete installation. - name
A reference for the control used as an id to provide ARIA support. - populate
Defaults to true. Used to enable or disable population of all fields. - onlyInputs
Defaults to false. Only input fields will be populated. - autoSearch
Defaults to false. Search will be triggered on field focus. - prompt
Defaults to false. Shows a message to prompt the user for more detail. - promptDelay
Defaults to 0. The time in milliseconds before the control will prompt the user for more detail. - setCursor
Defaults to false. Updates the input field with the current search text. - minSearch
Defaults to 1. Search will be triggered on field focus. - maxItems
Defaults to 0. The maximum number of items to show (0 = disabled). - manualEntry
Defaults to false. If no results are found, the message can be clicked to disable the control. - disableTime
Defaults to 60000. The time in milliseconds to disable the control for manual entry. - suppressAutocomplete
Defaults to true. Suppress the default browser field autocomplete on search fields. - setCountryByIP
Defaults to false. Automatically set the country based upon the user IP address. - culture
Force set the culture for labels, e.g. “en-us”, “fr-ca”. - languagePreference
The preferred language for the selected address, e.g. “eng”, “fra”.
Field Modes
- pca.fieldMode.DEFAULT
This is the default mode and combines the actions of SEARCH and POPULATE. - pca.fieldMode.POPULATE
This mode will populate the element with the AddressComplete field when a user selects an address. Typing in this field will not trigger an AddressComplete search. - pca.fieldMode.COUNTRY
This mode indicates a country selector. This can be used to select the country for AddressComplete to search in. - pca.fieldMode.SEARCH
This sets the field to an AddressComplete search field. Typing in this field will trigger searching via the AddressComplete control. - pca.fieldMode.NONE
This field will be ignored. - pca.fieldMode.PRESERVE
This prevents the field from being overwritten by AddressComplete.
Advanced AddressComplete Options
Triggering events when an address is returned
When an AddressComplete lookup returns an address, you may wish to trigger an event on your page, such as a success message. To do so, insert the following code into the header of your page, and include the event in the relevant section of the code.
<script type="text/javascript">
    addressComplete.listen('load', function(control) {
        control.listen("populate", function (address) {
            //add custom code here
        });
    });
</script>
Accessing the contents of the response from an address retrieve request
The contents of the response from an AddressComplete request can be accessed and then manipulated if you need to use the various elements of the address. Insert the code below into your page and then modify to access the relevant part of the address object (for example, in the example below: “Postcode”).
<script type="text/javascript">
    addressComplete.listen('load', function(control) {
        control.listen("populate", function (address) {
            document.getElementById("line1").value = address.Line1;
        });
    });
</script>
Address Complete altering/stretching your form
Depending on the layout and styling of your page, Address Complete might stretch the elements of your form, especially if they are very short. To avoid this, put the AddressComplete control into a div fixed to the same width as your fields. This can be done by using code like this:
<script type="text/javascript">
    addressComplete.listen('ready', function() {
        addressComplete.setWidth(300);
        addressComplete.setHeight(300);
    });
</script>
Changing drop-down font colour/size
To change the colour and font of the text that appears in the Address Complete search drop-down box, insert this code into the header of the page:
<style type="text/css">
    .pca .pcatext {
        font: 15px Verdana;
        color: #4682b4;
    }
</style>
Enabling/disabling the control dynamically
On some pages you may want to control when the AddressComplete lookup control is loaded, rather than it always being operational. Use the code below to enable/disable the control.
<script type="text/javascript">
    addressComplete.listen('ready', function() {
        addressComplete.enable();
        addressComplete.disable();
    });
</script>
Setting the country dynamically
You may wish to set the country for the AddressComplete control dynamically, either because of selections users have made, or the page they’re on. This will over-ride the default functionality that selects the country based upon the user’s IP address. Use the code below.
<script type="text/javascript">
    addressComplete.listen('ready', function() {
        addressComplete.setCountry("France");
    });
</script>
Locations you don’t want to deliver to
If you have some areas that you can’t deliver to then you may want to indicate this to your customers when they do their address lookup. The code below illustrates how this can be achieved by looking at a province in the response from the address lookup and displaying an appropriate error message when addresses in a specific province are returned. This could be adapted for other address elements such as cities or Postal Codes.
<script type="text/javascript">
    addressComplete.listen('load', function(control) {
        control.listen("populate", function (address) {
            if ( address.ProvinceCode == "ON" ||  address.ProvinceCode == "QC") {
                //EXAMPLE – do not deliver to ON or QC
                alert("Sorry we do not deliver to this address");
            }
        });
    });
</script>
Setting additional control options
You can override additional control options in order to change its style further.
<script type="text/javascript">
    addressComplete.listen('options', function(options) {
        options.bar = options.bar || {};
        options.bar.showCountry = false;
        options.bar.showLogo = true;
        options.bar.logoLink = false;
    });
</script>
Setting the language of the control
You can set the language of the control UI at any time to suit your current page language culture.
<script type="text/javascript">
    addressComplete.listen('ready', function() {
        addressComplete.setCulture("fr-CA");
    });
</script>
Changing the text of messages in the control
You can set the content of the messages displayed to users.
<script type="text/javascript">
    pca.messages.en.DIDYOUMEAN = "Did you mean:";
    pca.messages.en.NORESULTS = "No results found";
    pca.messages.en.KEEPTYPING = "Keep typing your address to display more results";
    pca.messages.en.RETRIEVEERROR = "Record could not be retrieved";
    pca.messages.en.SERVICEERROR = "Service Error:";
    pca.messages.en.COUNTRYSELECT = "Select Country";
    pca.messages.en.NOLOCATION = "Sorry, we could not get your location";
    pca.messages.en.NOCOUNTRY = "Sorry, we could not find this country";
</script>